Wayland only system using Nvidia drivers

My recent experience with Nvidia proprietary drivers and Wayland has been great. With the latest updates of EGL Wayland (1.1.16+), the performance of the Wayland session it’s on par with the X session and it’s free from visual artifacts and strange behaviours. Games running on Proton on Xwayland run smoothly and I can’t tell the difference between running them this way or under an X session.

As part of the Fedora 41 features, the workstation media will not install the X components by default, resorting to Wayland only. Of course the X components will still be available for install for corner cases (accessibility?), but they will not be installed by default.

To accomodate this, with the latest update of the Nvidia driver from the Nvidia/Multimedia repository it’s now possible to remove the X components and just leave the Wayland part without the need to remove the Nvidia driver as a whole.

There is a new subpackage called xorg-x11-nvidia which contains the X11 DDX driver, the GLX extension and the default X.org configuration file. This package can be removed along all X.org components and Gnome X session:

$ sudo dnf remove xorg-x11-server-Xorg
Dependencies resolved.
===================================================================================================================
 Package                            Architecture   Version                              Repository            Size
===================================================================================================================
Removing:
 xorg-x11-server-Xorg               x86_64         1.20.14-35.fc40                      @updates             3.6 M
Removing dependent packages:
 gnome-session-xsession             x86_64         46.0-1.fc40                          @fedora               16 k
 xorg-x11-drv-amdgpu                x86_64         23.0.0-3.fc40                        @fedora              186 k
 xorg-x11-drv-ati                   x86_64         19.1.0-11.fc40                       @fedora              477 k
 xorg-x11-drv-evdev                 x86_64         2.10.6-15.fc40                       @fedora               74 k
 xorg-x11-drv-fbdev                 x86_64         0.5.0-15.fc40                        @fedora               34 k
 xorg-x11-drv-intel                 x86_64         2.99.917-57.20210115.fc40            @fedora              2.0 M
 xorg-x11-drv-libinput              x86_64         1.4.0-2.fc40                         @fedora               98 k
 xorg-x11-drv-nouveau               x86_64         1:1.0.17-7.fc40                      @fedora              210 k
 xorg-x11-drv-openchrome            x86_64         0.6.400-7.20210215git5dbad06.fc40    @fedora              290 k
 xorg-x11-drv-qxl                   x86_64         0.1.6-3.fc40                         @fedora              166 k
 xorg-x11-drv-vesa                  x86_64         2.5.0-7.fc40                         @fedora               34 k
 xorg-x11-drv-vmware                x86_64         13.4.0-4.fc40                        @fedora              173 k
 xorg-x11-drv-wacom                 x86_64         1.2.2-1.fc40                         @updates             1.2 M
Removing unused dependencies:
 libXvMC                            x86_64         1.0.13-5.fc40                        @fedora               45 k
 mesa-libxatracker                  x86_64         1:24.1.6-1.fc40                      @fedora-multimedia    11 M
 nvidia-xconfig                     x86_64         3:560.35.03-2.fc40                   @fedora-multimedia    92 k
 xorg-x11-drv-wacom-serial-support  x86_64         1.2.2-1.fc40                         @updates              40 k
 xorg-x11-nvidia                    x86_64         3:560.35.03-2.fc40                   @fedora-multimedia    19 M
 xorg-x11-server-common             x86_64         1.20.14-35.fc40                      @updates             127 k

Transaction Summary
===================================================================================================================
Remove  20 Packages

Freed space: 38 M
Is this ok [y/N]:

The package xorg-x11-nvidia itself has reverse dependencies (Supplements) on the main Nvidia driver and X.org server packages, so in case of an install/reinstall of X.org with the Nvidia driver installed, the package gets added to the DNF transaction, making sure you have a working X session at the next login:

$ sudo dnf install xorg-x11-server-Xorg gnome-session-xsession
Last metadata expiration check: 0:36:46 ago on Sun 01 Sep 2024 09:11:59 PM CEST.
Dependencies resolved.
========================================================================================
 Package                   Arch      Version                 Repository            Size
========================================================================================
Installing:
 gnome-session-xsession    x86_64    46.0-1.fc40             fedora                13 k
 xorg-x11-server-Xorg      x86_64    1.20.14-35.fc40         updates              1.5 M
Installing dependencies:
 xorg-x11-drv-libinput     x86_64    1.4.0-2.fc40            fedora                50 k
 xorg-x11-server-common    x86_64    1.20.14-35.fc40         updates               36 k
Installing weak dependencies:
 xorg-x11-nvidia           x86_64    3:560.35.03-2.fc40      fedora-multimedia    2.3 M

Transaction Summary
========================================================================================
Install  5 Packages

Total download size: 3.9 M
Installed size: 23 M
Is this ok [y/N]:

All of this can be already performed on a Fedora 40 system. Just login using the standard “GNOME Session” (Wayland) and then remove the xorg-x11-server-Xorg package.

Plex desktop and HTPC client

Plex Desktop and HTPC clients are available again. Now Plex ships a precompiled QT 6 libraries with the private API enabled that allows for an easy packaging. The packages are available for EL9+ and Fedora on the x86_64 architecture only.

Just install the one you need via DNF. For the desktop application:

# dnf -y install PlexDesktop

For the HTPC application:

# dnf -y install plexHTPC

The packages come with every possible system library in use and can be installed in parallel. They both suggest all the VA-API drivers available in the multimedia repository.

Keep in mind that both sport MPV as the main player, so you can still customize the player options as you see fit. For example to force NVIDIA’s hardware decoding in both applications:

$ cat .local/share/plex/mpv.conf
hwdec=nvdec

The HTPC optional package that creates an auto starting “HTPC session” for set top box media players is not restored yet, I will add it in the next days.

The packages bundle QT 6 (for the web interface engine) with the private API enabled, FFMPeg with a progress API status reporting, a custom MPV and a CEC library in the HTPC client.

Why not using the official Flatpak installation directly? First of all I don’t like all the mounting and folder redirection of Flatpak, but also:

# flatpak install tv.plex.PlexDesktop tv.plex.PlexHTPC
Looking for matches…
Required runtime for tv.plex.PlexHTPC/x86_64/stable (runtime/org.freedesktop.Platform/x86_64/23.08) found in remote flathub
Do you want to install it? [Y/n]: y

tv.plex.PlexHTPC permissions:
ipc network pulseaudio x11 devices dbus access [1]

[1] org.freedesktop.PowerManagement, org.freedesktop.ScreenSaver

tv.plex.PlexDesktop permissions:
ipc network pulseaudio x11 devices dbus access [1]

[1] org.freedesktop.ScreenSaver


ID Branch Op Remote Download
1. org.freedesktop.Platform.GL.default 23.08 i flathub < 172.2 MB
2. org.freedesktop.Platform.GL.default 23.08-extra i flathub < 172.2 MB
3. org.freedesktop.Platform.GL.nvidia-555-58-02 1.4 i flathub < 305.0 MB
4. org.freedesktop.Platform.Locale 23.08 i flathub < 360.2 MB (partial)
5. org.freedesktop.Platform.openh264 2.2.0 i flathub < 944.3 kB
6. org.freedesktop.Platform 23.08 i flathub < 227.5 MB
7. tv.plex.PlexHTPC stable i flathub < 150.9 MB
8. tv.plex.PlexDesktop stable i flathub < 149.2 MB

Proceed with these changes to the system installation? [Y/n]:

That’s a whopping 1.5 GiB compressed download compared to the package footprint:

$ ls -1hs Plex*
106M PlexDesktop-1.96.0.177-3.fc40.x86_64.rpm
105M PlexHTPC-1.64.0.170-2.fc40.x86_64.rpm

That’s more than 7 times the size. Flatpak applications with duplicate libraries everywhere are not really my taste.

Prime / Optimus laptops and multi GPU systems

I’ve seen around tons of confusion about Optimus laptops, Prime and systems with multiple GPUs (like a desktop with an Nvidia dedicated GPU and an embedded AMD GPU) and how to configure them. People get mad with variables, scripts and extra tools.

The truth is, there’s not much to configure and since a few years, for most common cases, everything works out of the box.

Let’s take into consideration a very common case, a laptop with Intel + Nvidia GPU (Dell Precision 5680, Nvidia Optimus):

$ lspci | grep -i vga
00:02.0 VGA compatible controller: Intel Corporation Raptor Lake-P [Iris Xe Graphics] (rev 04)
01:00.0 VGA compatible controller: NVIDIA Corporation AD104GLM [RTX 3500 Ada Generation Laptop GPU] (rev a1)

And then let’s take the two most common cases into consideration to drive the GPUs.

  • Intel + Nouveau open source driver (DRI/DRI)
  • Intel open source driver + Nvidia proprietary driver (DRI/NVIDIA)

Power management

The system boots with the graphical output driven by the integrated Intel GPU (00:02.0) and the Nvidia GPU (01:00.0) is off.

$ cat /sys/bus/pci/devices/0000:{00:02.0,01:00.0}/power/runtime_status
active
suspended

A simple command that touches the PCI card like lspci or nvidia-settings is enough to wake up the Nvidia GPU for probing:

$ lspci > /dev/null 
$ cat /sys/bus/pci/devices/0000:{00:02.0,01:00.0}/power/runtime_status
active
active

A few seconds after, the GPU is again in suspended:

$ cat /sys/bus/pci/devices/0000:{00:02.0,01:00.0}/power/runtime_status
active
suspended

The transition is always fast if no program is using the GPU, it usually takes just 4 or 5 seconds for the GPU to turn off. For example after exiting a game, you hear immediately the fan shutting down when the GPU goes off.

This is the simplest way to check power state of the GPU both when using the open source Nouveau driver and the Nvidia proprietary driver.

VGA Switcheroo (DRM drivers only)

If you are using the open source driver, there are a few added benefits in terms of control. The VGA Switcheroo files appear as soon as two GPU drivers and one handler have registered with vga_switcheroo.  since multiple GPUs are using a common framework, vga_switcheroo is enabled and we we can manipulate the state of the devices:

$ sudo cat /sys/kernel/debug/vgaswitcheroo/switch
0:IGD:+:Pwr:0000:00:02.0
1:DIS-Audio: :DynOff:0000:01:00.1
2:DIS: :DynOff:0000:01:00.0

After firing up the GPU for a workload, we can see the state reflected into the virtual file:

$ sudo cat /sys/kernel/debug/vgaswitcheroo/switch
0:IGD:+:Pwr:0000:00:02.0
1:DIS-Audio: :DynOff:0000:01:00.1
2:DIS: :DynPwr:0000:01:00.0

The DIS-Audio device is the actual HDA sound card on the GPU that is used to send output to an external output (ex. HDMI). That is also controlled by the dynamic control of the devices.

The configuration is flexible, so for example you could have two or more discrete GPUs and one extra audio controller for an eventual HDMI port.

You can also do some really lowlevel stuff, like this one to switch the display output to the discrete GPU if you have an old system with disconnected GPUs that uses a MUX to switch the display output:

$ sudo echo MDIS > /sys/kernel/debug/vgaswitcheroo/switch

Selecting the GPU to use when running a program from the desktop

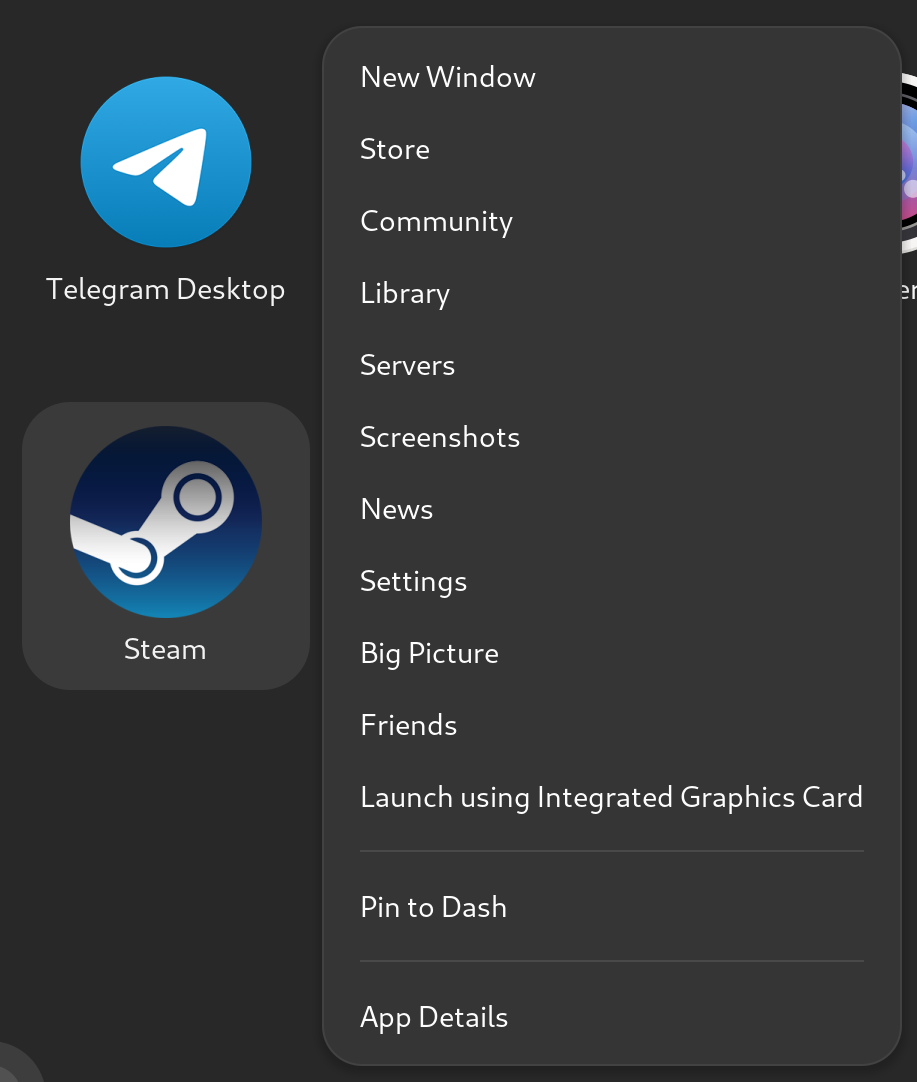
If running on Gnome or KDE, any application can be selected to run on the discrete GPU directly from the desktop by right clicking on the icon:

This is supported both in the case of multiple DRI/DRM devices and or a combination with Nvidia proprietary drivers. There is no visible difference between the two.

Both Gnome and KDE feature an extra setting that can be added to desktop menus to prefer the integrated GPU. For example Steam provides this by default:

$ cat /usr/share/applications/steam.desktop | grep -i GPU
PrefersNonDefaultGPU=true
X-KDE-RunOnDiscreteGpu=true

Applications bearing those entries receive the opposite treatment, they run by default on the discrete GPU and by right clicking we can select the internal GPU:

Selecting the GPU to use with switcherooctl

The system comes with a userspace utility to manipulate the GPUs and that also prints the variables you can use to address a specific GPU. Prime / VGA Swicheroo case:

$ switcherooctl list
Device: 0
  Name:        Intel Corporation Raptor Lake-P [Iris Xe Graphics]
  Default:     yes
  Environment: DRI_PRIME=pci-0000_00_02_0

Device: 1
  Name:        NVIDIA Corporation AD104GLM [RTX 3500 Ada Generation Laptop GPU]
  Default:     no
  Environment: DRI_PRIME=pci-0000_01_00_0

The DRI_PRIME variable is never set by default and it’s assumed to be at 0 (so main integrated GPU in most cases) if nothing else sets it.

In the case of Nvidia proprietary drivers, the tool is smart enough to set the appropriate Nvidia variables to achieve the same result:

$ switcherooctl list
Device: 0
  Name:        Intel Corporation Raptor Lake-P [Iris Xe Graphics]
  Default:     yes
  Environment: DRI_PRIME=pci-0000_00_02_0

Device: 1
  Name:        NVIDIA Corporation AD104GLM [RTX 3500 Ada Generation Laptop GPU]
  Default:     no
  Environment: __GLX_VENDOR_LIBRARY_NAME=nvidia __NV_PRIME_RENDER_OFFLOAD=1 __VK_LAYER_NV_optimus=NVIDIA_only

Think of switcherooctl as a replacement for setting up variables. For example, if your system has 4 GPUs and you want to target the 4th GPU, these commands are equivalent:

$ switcherooctl launch -g 3 <command>
$ DRI_PRIME=3 <command>
$ DRI_PRIME=pci-0000_03_00_0 <command>

Selecting the GPU to use with environment variables

OpenGL context

OpenGL came in before this multiple GPU – multiple GPU vendor thing existed, so by default, the first used GPU is the one used to run OpenGL applications in the main display and leave the second GPU off:

$ glxinfo -B | grep string
OpenGL vendor string: Intel
OpenGL renderer string: Mesa Intel(R) Graphics (RPL-P)
OpenGL core profile version string: 4.6 (Core Profile) Mesa 24.0.8
OpenGL core profile shading language version string: 4.60
OpenGL version string: 4.6 (Compatibility Profile) Mesa 24.0.8
OpenGL shading language version string: 4.60
OpenGL ES profile version string: OpenGL ES 3.2 Mesa 24.0.8
OpenGL ES profile shading language version string: OpenGL ES GLSL ES 3.20
$ cat /sys/bus/pci/devices/0000:{00:02.0,01:00.0}/power/runtime_status
active
suspended

In the case of the Intel + Nvidia proprietary drivers, we can use the Nvidia variables consumed by the proprietary driver to select the GPU and let the system power on the extra GPU:

$ __NV_PRIME_RENDER_OFFLOAD=1 __GLX_VENDOR_LIBRARY_NAME=nvidia glxinfo -B | grep string
OpenGL vendor string: NVIDIA Corporation
OpenGL renderer string: NVIDIA RTX 3500 Ada Generation Laptop GPU/PCIe/SSE2
OpenGL core profile version string: 4.6.0 NVIDIA 555.42.02
OpenGL core profile shading language version string: 4.60 NVIDIA
OpenGL version string: 4.6.0 NVIDIA 555.42.02
OpenGL shading language version string: 4.60 NVIDIA
OpenGL ES profile version string: OpenGL ES 3.2 NVIDIA 555.42.02
OpenGL ES profile shading language version string: OpenGL ES GLSL ES 3.20
$ cat /sys/bus/pci/devices/0000:{00:02.0,01:00.0}/power/runtime_status
active
active

If we are using open source drivers for both Intel + Nvidia (Nouveau), we can use the Mesa DRI variables to select the GPU:

$ DRI_PRIME=1 glxinfo -B | grep string
OpenGL vendor string: Mesa
OpenGL renderer string: NV194
OpenGL core profile version string: 4.3 (Core Profile) Mesa 24.0.8
OpenGL core profile shading language version string: 4.30
OpenGL version string: 4.3 (Compatibility Profile) Mesa 24.0.8
OpenGL shading language version string: 4.30
OpenGL ES profile version string: OpenGL ES 3.2 Mesa 24.0.8
OpenGL ES profile shading language version string: OpenGL ES GLSL ES 3.20

We can now use both ways of checking the power state of the GPUs via the PCI devices or with VGA Switcheroo:

$ cat /sys/bus/pci/devices/0000:{00:02.0,01:00.0}/power/runtime_status
active
active
$ sudo cat /sys/kernel/debug/vgaswitcheroo/switch
0:IGD:+:Pwr:0000:00:02.0
1:DIS-Audio: :DynOff:0000:01:00.1
2:DIS: :DynPwr:0000:01:00.0

VA-API (Video Acceleration API) context

$ vainfo | grep version
libva info: VA-API version 1.21.0
libva info: Trying to open /usr/lib64/dri/iHD_drv_video.so
libva info: Found init function __vaDriverInit_1_21
libva info: va_openDriver() returns 0
vainfo: VA-API version: 1.21 (libva 2.21.0)
vainfo: Driver version: Intel iHD driver for Intel(R) Gen Graphics - 24.2.3 (Full Feature Build)
$ cat /sys/bus/pci/devices/0000:{00:02.0,01:00.0}/power/runtime_status
active
suspended

VA-API has its own set of variables for selecting which driver to use in the case of Intel + Nvidia proprietary drivers:

$ LIBVA_DRIVER_NAME=nvidia vainfo | grep version
libva info: VA-API version 1.21.0
libva info: User environment variable requested driver 'nvidia'
libva info: Trying to open /usr/lib64/dri/nvidia_drv_video.so
libva info: Found init function __vaDriverInit_1_0
libva info: va_openDriver() returns 0
vainfo: VA-API version: 1.21 (libva 2.21.0)
vainfo: Driver version: VA-API NVDEC driver [direct backend]
$ cat /sys/bus/pci/devices/0000:{00:02.0,01:00.0}/power/runtime_status
active
active

Again, with the open source stack, also the DRI variable or switcherooctl are required:

$ DRI_PRIME=1 LIBVA_DRIVER_NAME=nouveau vainfo | grep version
libva info: VA-API version 1.21.0
libva info: User environment variable requested driver 'nouveau'
libva info: Trying to open /usr/lib64/dri/nouveau_drv_video.so
libva info: Found init function __vaDriverInit_1_21
libva info: va_openDriver() returns 0
vainfo: VA-API version: 1.21 (libva 2.21.0)
vainfo: Driver version: Mesa Gallium driver 24.0.8 for NV194
$ cat /sys/bus/pci/devices/0000:{00:02.0,01:00.0}/power/runtime_status
active
active

VDPAU context

VDPAU is pretty much dead, there is no support for Optimus/Prime laptops and no support for Wayland.

Vulkan or EGL context

Vulkan and EGL were thought with this use case in mind and the selection of the GPU to use ties into the extensions, so usually the correct one is already considered by the program using the appropriate API. The program can query a particular extension to get an ordered list of GPUs or with some other mechanism. This is usually performed by the program itself, so there is not really a way to “force” one specific GPU.

For example, vkcube allows us to select the GPU:

$ vkcube --gpu_number 0 --c 20
Selected GPU 0: Intel(R) Graphics (RPL-P), type: IntegratedGpu
$ vkcube --gpu_number 1 --c 20
Selected GPU 1: NVIDIA RTX 3500 Ada Generation Laptop GPU, type: DiscreteGpu

Contrary to the OpenGL context, you can check with the following commands that there is always a list of GPUs to use and never a single GPU information:

$ eglinfo -B
$ __NV_PRIME_RENDER_OFFLOAD=1 eglinfo -B
$ vulkaninfo --summary

There are some variables or programs that can be used to influence the extensions used for querying the GPUs, but it’s not really a supported path. The application decides based on the information provided by the drivers and some predefined criteria.

Forcing the usage of X on a specific GPU in a Wayland context

Everything described so far is applied as well to Wayland. On top of that, Xwayland is started whenever an application that does not support Wayland yet is started in a Wayland desktop.

If you want to force the use of Xwayland for a program that supports both Wayland and X, then you just need to set an additional variable.

For example, depending on the context (DRI, Nvidia, etc), these are all equivalent:

$ XDG_SESSION_TYPE=X11 __NV_PRIME_RENDER_OFFLOAD=1 __GLX_VENDOR_LIBRARY_NAME=nvidia glxgears
$ XDG_SESSION_TYPE=X11 DRI_PRIME=1 glxgears
$ XDG_SESSION_TYPE=X11 switcherooctl launch -g 1 glxgears

CUDA with unsupported GCC versions

When running the CUDA stack on a recent Fedora distribution, you’re very likely to hit the compatibility issue with the current GCC release not being yet supported by NVCC. This is quite easy to address, but not many people seem to know it.

At the moment of writing, CUDA 12.4 has GCC 13.x support, while Fedora 40 ships with GCC 14.

Since a few years I’ve been shipping a cuda-gcc package which appears as a drop in replacement for NVCC. It can be installed along with CUDA and the drivers from the Nvidia or multimedia repository or from a Fedora COPR if you are running the upstream CUDA packages provided by Nvidia.

This GCC version is hidden from the main path and is explicitly used by NVCC when compiling something. Installing the cuda-gcc-c++ package creates profile entries in /etc/profile.d that just do this:

# dnf -y install cuda-gcc-c++
$ cat /etc/profile.d/cuda-gcc.sh 
export NVCC_PREPEND_FLAGS='-ccbin /usr/bin/cuda'

Logout/login or reload your profile and you’re good to go.

This way, every time you invoke NVCC you are not using the system compiler but the one provided by the cuda-gcc package.

On a Red Hat Enterprise Linux based distribution you can achieve the same result by installting the development toolset of your choice and activating the environment for it. This is usually not an issue as NVCC is officially supported on those distributions.

Server replaced

Due to some failure, the old server went offline and needed to be recovered. Easy fix, but required console access for repairing.

Unfortunately, the NOT awesome support of the housing provider locked me out of the management console for 4 days straight before they fixed some issues and granted me access again.

According to them, I should have just waited for days without doing anything. Since this is not an option, I reinstalled the server with all the repositories (rsync and https) and switched the DNS record to it.

Today I finally regained access to the old server and picked up one file that I needed to restore the database, so here is up again. On the positive side:

  • It’s a much more capable hardware with SSD drives
  • Updated OS
  • Updated hardening policies (CIS, NIST, and some other stuff)
  • Configuration/setup is fully automated
  • I have full access on the console in case of issues
  • It’s available on IPv6
  • Proper crypto policies (it’s now listed as A on the Qualys website):

Nvidia proprietary and open source kernel modules

With the latest bunch of updates to the Nvidia and Multimedia repositories, I’ve added the ability to switch to the two implementations of the kernel modules currently available in the Nvidia driver for Linux.

Since almost a year, the Nvidia driver ships with two different implementations of the kernel modules, one proprietary and one open source. The open source one as of drivers 545.x is now considered beta quality also for the workstations, so it seems a good moment to start shipping it.

The open source one is supposed to be the only one that will be kept in the future, but at the moment both are available and both differ in terms of functionality. You can read about the main differences in terms of functionality and what chips they support in the official documentation.

I did not want to introduce another variation of the kernel modules beside akmods, kABI and DKMS, this would have created even more confusion and lots of dependencies in the SPEC files for the variations. The new akmod and DKMS packages ship both sources (MIT/GPL and proprietary kernel modules) and allow you to switch between one or the other through a configuration file.

Considering that in the long run only the open source variant will remain, I wanted to make this as transparent as possible for the users. Basically, if you don’t care and just want something that works, nothing has changed for you.

The two sources get referenced as they are referenced inside the Nvidia run file, namely “kernel” for the original proprietary kernel modules and “kernel-open” for the new open source variation.

The following instructions show you how to switch between one implementation or the other.

DKMS

Check which version you have installed:

# modinfo -l nvidia
NVIDIA

Change the type of modules you want to use and trigger a rebuild and a reinstall:

# sed -i -e 's/kernel$/kernel-open/g' /etc/nvidia/kernel.conf
# dkms build -m nvidia/545.29.02 --force
# dkms install -m nvidia/545.29.02 --force

Now check again the license and you should see that it has changed to MIT/GPL:

# modinfo -l nvidia
Dual MIT/GPL
# reboot

To switch back, change the configuration again and then trigger the same process for rebuilding installing:

# sed -i -e 's/kernel-open$/kernel/g' /etc/nvidia/kernel.conf
# dkms build -m nvidia/545.29.02 --force
# dkms install -m nvidia/545.29.02 --force
# reboot

akmods

Check which version you have installed:

# modinfo -l nvidia
NVIDIA

Change the type of modules you want to use and trigger a rebuild and a reinstall:

# sed -i -e 's/kernel$/kernel-open/g' /etc/nvidia/kernel.conf
# akmods --rebuild

Now check again the license and you should see that it has changed to MIT/GPL:

# modinfo -l nvidia
Dual MIT/GPL
# reboot

To switch back, change the configuration again and then trigger the same process for rebuilding installing:

# sed -i -e 's/kernel-open$/kernel/g' /etc/nvidia/kernel.conf
# akmods --rebuild
# reboot

Xbox Series X|S Wireless controller in Fedora/Steam

I recently had to replace a chep quality Xbox-like controller with a proper one, so I decided to get an Xbox controller. This gives me the proper experience in Steam and games which support Xbox controllers in the various configuration options.

I’ve decided to purchase an Xbox Series X|S Wireless controller, which is USB / USB-C or BLE (Bluetooth Low Energy). No issues with USB, the controller is recognized properly, including vibration, but to get it working via Bluetooth it requires a bit of extra software.

image

So here are the packages and how to connect it.

USB / USB-C connection

Just plug it in, it will instantly be recognized. Nothing else to do in this case.

usb 1-3: new full-speed USB device number 12 using xhci_hcd
usb 1-3: New USB device found, idVendor=045e, idProduct=0b12, bcdDevice= 5.07
usb 1-3: New USB device strings: Mfr=1, Product=2, SerialNumber=3
usb 1-3: Product: Controller
usb 1-3: Manufacturer: Microsoft
usb 1-3: SerialNumber: 3039373133333431323636313230
input: Generic X-Box pad as /devices/pci0000:00/0000:00:14.0/usb1/1-3/1-3:1.0/input/input31
usb 1-3: USB disconnect, device number 12

Bluetooth Low Energy connection

Requirements:

  • An up to date 5.13 kernel (already available in Fedora updates)
  • A Bluetooth Low Energy adapter in your system
  • Updated firmware on the controller (5.7 at the time of writing this)
  • Packaged xpadneo software

Firmware update

First of all, make sure your firmware is up to date on the device. Before updating the firmware, I had some issues with Bluetooth constantly cycling with pairing. To update the firmware, unfortunately you have to use a Windows system.

Install the Xbox Accessories app, plug in the controller and follow the wizard to update the controller.

If you already attempted to pair the controller without updating the firmware and then you try again with the new firmware, you might have issues pairing. To fix this, delete all cache files of the Bluetooth stack in Fedora before attempting the connection again:

find /var/lib/bluetooth/ -name cache -exec rm -fr {} \;

Bluetooth Low Energy Adapter

Just run this command, if it shows the setting “le” then it means you have Low Energy support:

$ btmgmt info
Index list with 1 item
hci0:	Primary controller
	addr 00:0A:CD:3B:E0:A5 version 6 manufacturer 10 class 0x7c0104
	supported settings: powered connectable fast-connectable discoverable bondable link-security ssp br/edr le advertising secure-conn debug-keys privacy static-addr phy-configuration 
	current settings: powered connectable discoverable ssp br/edr le secure-conn 
	name workstation.localdomain
	short name 

Packaged xpadneo software

The necessary packages are both in the Steam repository and the Multimedia repository.

Execute one of the following commands to install the appropriate packages.

With akmod:

# dnf -y install akmod-xpadneo
# akmods --force

With DKMS:

# dnf -y install dkms-xpadneo
# dkms build -m xpadneo/0.9.1 
# dkms install -m xpadneo/0.9.1

If you don’t want to trigger the builds manually you can just reboot the system, both DKMS and akmods will take care of rebuilding the necessary kernel modules.

Checking that everything works in BLE mode

Open the GNOME Bluetooth settings, then:

  • Keep the wireless button on the controller pressed for a few seconds until the Xbox logo blinks fast
  • Click on the Xbox Wireless Controller - Not set up entry

After pairing, you will see the following entry in the Bluetooth settings panel:

xbox-bt-paired

And in the Power settings panel you can also see the battery status:

xbox-bt-battery

Finally, in the kernel messages you should see a message like the following:

xpadneo 0005:045E:0B13.0004: pretending XB1S Windows wireless mode (changed PID from 0x0B13 to 0x02E0)
xpadneo 0005:045E:0B13.0004: working around wrong SDL2 mappings (changed version from 0x00000507 to 0x00000903)
xpadneo 0005:045E:0B13.0004: report descriptor size: 283 bytes
xpadneo 0005:045E:0B13.0004: fixing up Rx axis
xpadneo 0005:045E:0B13.0004: fixing up Ry axis
xpadneo 0005:045E:0B13.0004: fixing up Z axis
xpadneo 0005:045E:0B13.0004: fixing up Rz axis
xpadneo 0005:045E:0B13.0004: fixing up button mapping
xpadneo 0005:045E:0B13.0004: enabling compliance with Linux Gamepad Specification
input: Xbox Wireless Controller as /devices/virtual/misc/uhid/0005:045E:0B13.0004/input/input32
xpadneo 0005:045E:0B13.0004: input,hidraw2: BLUETOOTH HID v9.03 Gamepad [Xbox Wireless Controller] on 00:0a:cd:3b:e0:a5
xpadneo 0005:045E:0B13.0004: controller quirks: 0x00000050
xpadneo 0005:045E:0B13.0004: Xbox Wireless Controller [f4:6a:d7:72:3c:ef] connected

If everything is good, then let’s check how Steam reports the controller:

xbox-bt-steam-bp

Voilá, you have an Xbox controller running over Bluetooth LE without any extra dongle.

Powering on / off the controller

After a bit of time without using the controller, it will turn off on its own. To bring it up again and quickly re-pair it, just press the Xbox logo on it.

Wayland/modesetting on Nvidia

With the latest Nvidia drivers it seems that modesetting and Wayland work fine for Gnome and GDM.

Console text is still a normal console, but upon boot you get the native screen resolution in Plymouth and then you can login under both X.org and Wayland sessions.

Screenshot-from-2020-07-11-08-06-56

How to test? Make sure that you have the following line enabled for the nvidia-drm module:

# cat /usr/lib/modprobe.d/nvidia.conf | grep drm
options nvidia-drm modeset=1

And then make sure to comment out the following line in the udev rules supplied by GDM:

# cat /usr/lib/udev/rules.d/61-gdm.rules | grep -i nvidia
# disable Wayland when using the proprietary nvidia driver
#DRIVER=="nvidia", RUN+="/usr/libexec/gdm-disable-wayland"

Then reboot, and you will login with a Wayland session by default:

# cat /sys/module/nvidia_drm/parameters/modeset 
Y
# cat /sys/module/nvidia_drm/version 
450.57
$ lsmod | grep nvidia
nvidia_drm             57344  4
nvidia_modeset       1187840  3 nvidia_drm
nvidia_uvm           1130496  0
nvidia              19726336  208 nvidia_uvm,nvidia_modeset
drm_kms_helper        249856  1 nvidia_drm
drm                   618496  7 drm_kms_helper,nvidia_drm
$ env | grep XDG_SESSION_TYPE
XDG_SESSION_TYPE=wayland
$ lspci | grep -i vga
01:00.0 VGA compatible controller: NVIDIA Corporation GP106 [GeForce GTX 1060 6GB] (rev a1)

Bigger dedicated server

As you might have noticed, in the last few weeks there were issues with the website and repositories.

This was due to the fact that after all the load moved to the dedicated server, the sizing of it was not enough to cope with load. CPU usage constantly at limit and not enough memory that resulted in OOM killing (most of the time) the database.

I’m just finished replacing the server with a bigger one (4 times the size), hope this would be enough for the moment. If not, I will separate the repository download from the main website.

Hope that this will be stable for a while.